The Blog

The Other Side of the Chair

SO I decided to make a drastic change with my hair. Being that I am not a hair dresser I know little about that department at all.  I was so amazed at what I learned during my transformation and I really want all my readers to know what should be happening when you sit down with your hair dresser.  I can only touch on my own personal experiences in the past from getting my hair done at other salons.  I am writing this blog from my own personal experience with Heather Slaybaugh a master colorist and educator at Jenniffer and company.

First of all let me start by saying how nervous I was to go from dark hair to hot pink.  I decided to do it for my sister fighting through breast cancer.  I had my hair colored blonde one other time and it was not a good experience at all.  The hair dresser didn’t listen to what I wanted, didn’t think about the integrity of my hair, was absent thru most of the service, and didn’t tell me how to take care of my hair.  I was sitting under a dryer with a second round of bleach on my hair and it started smoking! I finally found her and she said “that was normal!” Well needless to say my hair was fried and I had to cut it all off.

Before and in the process

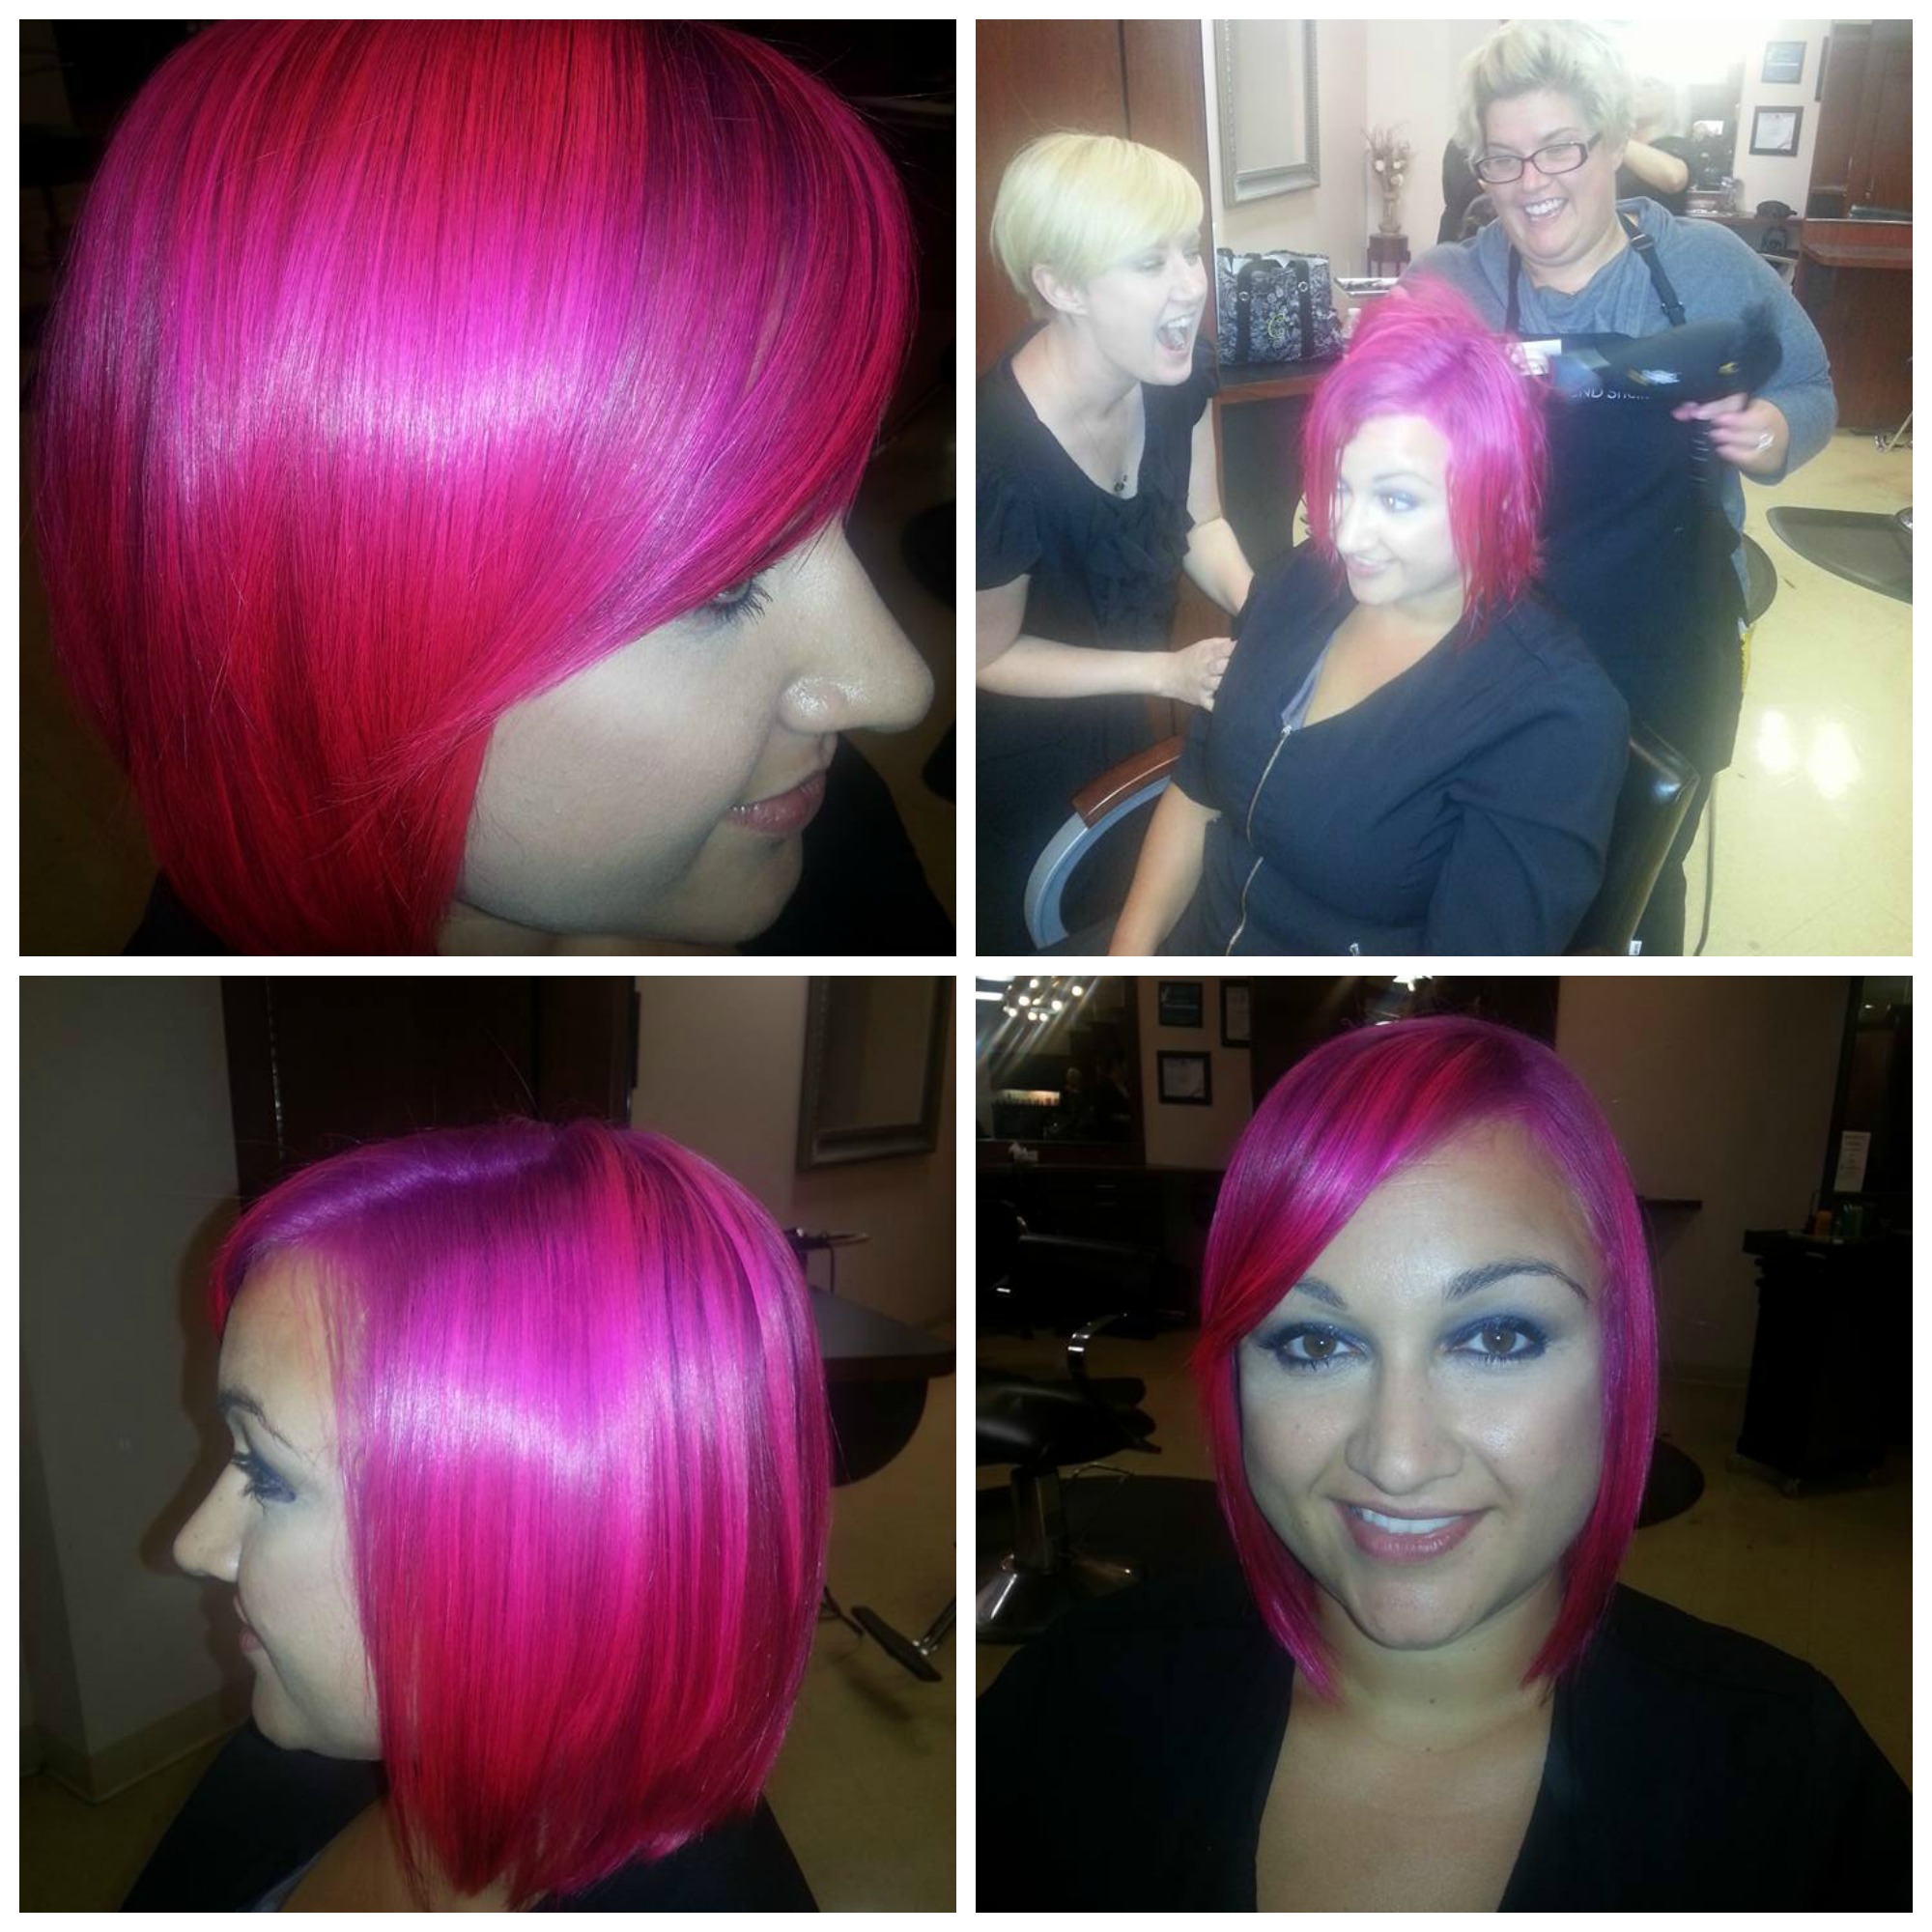
I explained to Heather what I was looking for and my experience in the past.  In the consult she gave me different options on how to accomplish my desired look, pricing, timing it would take, and finally how to keep my hair in good condition.  I knew confidently what I was going into and I was ready!!! She kept me comfortable and interacted with me during my 5 hour process.  She explained what she was using and why.  She chose to use a gentle decolorizer that gave me a max lift and left my hair silky soft! Because of my dark hair she chose to add a deeper color to my roots so as my hair grew out it wouldn’t look undone.  She finally finished me off with an amazing color line called Elumen.  It is the only permanent color line out there for bright colors! It left my hair shiny, calmed my frizz, and added thickness to my hair.  She called it a bandage in a bottle and it really was!

The time flew by and I was so excited for the final result! She turned me around and I was beyond amazed.  She took her time and went above and beyond to give me what I wanted.  She then explained the importance of home maintenance to keep the color vibrant and after all I did just invest time and money into this look! She explained what products to use, to wash it in cool water, and to always blow dry it to keep the color sealed in.

Done

Thank you Heather Slaybaugh for the amazing experience, education, and over all look! I am 3 weeks into my color and it looks as perfect as it did the first day and my hair still feels so soft! So next time you go to your hair dresser see if they do the same for you.  If not then you aren’t getting the service and results you deserve!

Jenniffer & Company will be at St. Noel’s Bridal Show

I am so excited announce that Jenniffer & Company will be at St. Noel’s Bridal Show Sunday, September 27th from 11am to 4pm. This is the biggest bridal show of the year that Jenniffer & Company participates in. The bridal show offers dozens of bridal booths for every bridal need! NJenniffer & Company will not only be doing hair and makeup for the runway show, we will also have a booth set up where you can win prizes!  Our bridal team will be there to answers any questions you may have.   You will also have the opportunity to see the full range of bridal services that we have to offer.  St. Noel’s Bridal Show is a high energy event  offers appetizers and drinks for you to taste!  And hopefully, Tuxedo Junction will have their awesome dancers come out and put on a show for us! Other vendors will also have prizes and might even have destination vacation giveaways.

Take a look at last years video: St. Noel’s Bridal Show 2014

I can only speak from years past but either way you will have a ball! So come taste good food, try delious cake, and watch Jenniffer & Company’s hair and makeup strut down the aisle!  Can’t waite to see you!


Kristine Kerr

Acne

So in today’s blog to keep going with the theme of Skin Care September we are going to talk about Acne and Rosacea. So many people are touched by this and A-can’t get it under control B-Are not using the right products or C-Don’t know they have this.

So let’s start off with acne! According to the Acne Research Center 85% of teenagers and 20% of adults suffer from acne. Acne is the disorder of oil glands. Your skin acquires makeup, dead skin, oil, sweat and so much more throughout the day. It falls into your oil glands and hair follicles and becomes clogged because your skin can not properly push the debris out. There are many causes that can trigger this disorder. Let’s start with my favorite and most scary one!
Demodex Mites. Yep we all have them! However, 90% of teen acne is caused from these creepy little mites and the other 10% are caused from bacteria. Reference from Click here for more information on Demodex mites

These mites live in the base of your hair follicle and come out at night to feed on your oil and debris. Upon death they excrete waste and bacteria which spreads and blocks pores. They are extremely active during breakouts. The other and more well known causes are from sugar, dairy, and hormones. Dairy boosts testosterone hormones in body and sugar spikes blood sugar which in turn increases hormone production. Hormones stimulate oil production and BANG you have acne. Most people run straight to products that are too strong and strip the skin like ProActive. Proactive is meant for stage 4 acne. So unless you face looks like this do not use it! How to treat it? Talk to your esthetician or dermatologist to get you on a prop skincare diet. Also look for ingredients that have Salicylic Acid, Glycolic Acid, Benzoyl Peroxide, and retinoids to name a few. Change your pillowcase at least once a week and cleanse you skin before going to bed. Stay tuned for part 2 to this blog where I will talk about Rosacea!
By Kristine Kerr

Tips and Tricks for an Inexpensive, Beautiful Wedding

Many women think it costs a lot of money to plan the perfect wedding. It can definitely get expensive, but here is some advice on how to plan a beautiful wedding on a budget.

First, start out by “Pinteresting” on www.pinterest.com.  Seriously, Pintrest can be your best friend. I use it constantly for at home projects and that has savedme so much money.  “Pinteresting” also helps you recycle things that you would normally throw out. Recycling can be super thrifty, especially with decorations such as center pieces, table runners, and even decorations for around the alter. Brides can and sometime will, spend hundreds of dollars on center pieces, when they can spend forty or so dollars on “DIY-ing.”

Here is a centerpiece idea: A simple, yet elegant look is mason jars. They are super trendy and affordable. Depending on the size, you can get twelve mason jars for about ten to twenty dollars, floating candles for around eight dollars and marbles for around five. For this you fill the bottom of the jar with some marbles, fill with water, and place the floating candle on top. Simply add fake rose petals around the bottom for a cute little touch. Here’s an idea for center pieces that costs about thirty dollars for a set of twelve centerpieces.

Beyond centerpieces, Pinterest can also give you so many trendy but inexpensive ideas for where to have your wedding. Something that I have seen a lot of in recent years is holding the ceremony in a national park. Here are some things to consider when holding your ceremony in a national park. It is important that you remember that you have to apply for a permit, and once accepted it is free or close to nothing. In addition to the permits, make to sure that you are aware of all the park rules before pulling off that beautiful wedding. A park wedding may not be for everybody, but will be a wedding you and your quests will remember.

Here is another tip, it may sound a little cheesy, but it can end up saving you hundreds, and even close to a thousand or so dollars. Bring your own beer. Not everybody in your friend or family circle drinks. Having your guest bring their own alcohol eliminates a few factors, one the cost, but also the fact some people are not satisfied with the alcohol served at weddings. This puts the responsibility on them.

Flowers can get really expensive; many brides are going with simpler flowers other than roses that can be just as beautiful. Flower can be simple and beautiful with just tulips, baby’s breath and even just carnations.

Getting down to one of a bride’s biggest expenses: the dress. Here is an idea, start out at a consignment shop. Many towns, even in northeast Ohio, have consignment dress shops. This is a thrifty way to save tons of money and still get a beautiful gown. Consignment shops can have something that a bridal store might not have. If consignment shops don’t work out, move onto friends and family. I know many girls that re-wear their sister’s, cousin’s or friend’s dresses, and even their mother’s but get a few alterations to make it trendy. Another idea for dresses is to go online. Ordering something from a bridal shop offline can save you money compared to actually going into a store.

I hope that you can use a few of these simple tricks and tips to save money as well as giving you some fresh ideas for your wedding day! Happy planning!

Sara Ohler:  Jenniffer & Company Bridal Coordinator

Kristine Kerr

Microdermabrasion and Dermaplaning

Microdermabrasion and Dermaplaning have become two of Jennifer and Company’s top selling skin care services. Today, I want to tell you about both to help you decide which treatment would be best for you.

Microdermabrasion  is a machine that sucks and blows tiny crystals on the skin.  It pretty much acts like a buffer! The suction increases blood flow and stimulates collagen.  This leaves the skin looking plump and full of life.  As the crystals hit the skin it removes dead skin and debris from pores.  This helps to minimize the pores.  It also helps with dull dry skin, fine lines, and acne scarring.  It is recommended you do a series of 4 to 6 treatments a week apart from each other to receive the full benefits.  This treatment is not for everyone though.  If you have rosacea or cystic acne forget it.  It will just stimulate redness and cause further breakout in the skin.  Also if you are on any acne medications or retinols you would have to stop using a couple days prior and post treatment.  Also it is highly recommended you don’t tan.  In fact if you do tan I will not perform this treatment on you because once the dead skin is gone it leaves you highly exposed to great damage like burning and hyperpigmentation (sun spots.) The contraindications to this are: peeling, swelling, redness, and feeling of wind burn.

Dermaplaning is similar and different to micro.  Instead of a machine your esthetician will manually use a scalpel in a light scraping motion to physically remove dead skin and hair.  Yes it may sound scary but it really is not.  In fact this is my favorite treatment! This is like getting a chemical peel without any peeling removing 2-3 weeks of built of dead skin and left over makeup.  It leaves your skin looking renewed and soft and allows for you’re at home products to work deeper in the skin.  This is also great for people with access hair on the face.  If waxing breaks you out then this is a great alternative!  It keeps the fine hair away for up to 5 weeks just like waxing.  Yes coarser hair will grow back quicker because that is the nature of the hair.  Again this is not for everyone like people who have acne.  But good news is just about every other skin type can benefit from this.  This treatment is recommended once every 4-5 weeks.  Again you cannot be on any acne medication or retinols.  If you tan will not do this on you either.  The contraindications to this are: small nicks in skin, redness, allergic reaction to nickel, raised lesions, and inflamed acne.

Both micro and derm work to exfoliate the skin in different ways and may be combined with chemical peels to work deeper into the skin.  We start out by cleansing and wiping the skin with alcohol to tighten and remove any oil.  The treatment is done and then the rest of your daily skincare products are applied.  Both treatments take about a half an hour.  It is highly recommended that you purchase a zinc oxide based Sunscreen (like our Image Prevention SPF.)  Your skin is left highly exposed to the sun and environment so you need to keep it protected or you are just throwing $$ away getting these treatments.   

By Kristine Kerr-Managing Esthetician

Brides Quick and Easy Timeline

Bridal Beauty Timeline: A quick timeline suggested to make for easy, stress free wedding planning!

9-­12 Months Prior: ­

  • Basic planning: picking and booking of venue, start looking at dresses, look into vendors, salons, caterers, etc. for pricing and availability. ­
  • Set a budget, discuss with your parents, or fiance (depending on who’s helping to pay for the big day.) ­
  • Draft guest list ­ If you plan on “shedding for the Wedding,” set and begin an exercise and/or diet plan for yourself. ­
  • Pick the bridal party and ask your girls to be a part of your big day! ­
  • Test any new hair cuts or colors you have been considering

6-­9 Months Prior: ­

  • Mail out the Save­the­dates! ­
  • Plan and get your engagement photos done ­
  • Book hair and makeup appointments for you and your bridal party (At Jenniffer’s of course!) at least 6 months prior, but even a year before is normal. ­
  • If you are having one, your engagement party ­ Pick your wedding dress and make it official! ­
  • Book honeymoon hotels, any reservations, or flights ­
  • Pick an officiant ­
  • Make a final guest list

4­-6 Months Prior: ­

  • Finalize bridesmaids and groomsmen attire ­
  • Cake testing and ordering ­
  • Confirm all vendors and caterers ­
  • Plan rehearsal dinner ­
  • Register for your bridal shower gifts

2-4 Months Prior: ­

  • Send out invitations for the wedding day! ­
  • Make any final wedding day accessory choices ­
  • Whiten your teeth with your dentist, or start your at home routine.

1 Month Prior: ­

  • Apply for your marriage license 4­6 weeks prior to your wedding day ­
  • Print out all the wedding ceremony programs and any other stationery ­
  • Write and finalize your vows ­
  • Bridal shower ­
  • Hair and makeup trials (we suggest no less than a month prior)

1-­2 Weeks Prior: ­

  • Bachelorette Party ­ Final dress fitting ­
  • Final head count ­
  • Finalize seating chart ­
  • Get your hair trimmed and colored ­
  • Don’t forget about the future hubby, get his hair all trimmed

48 Hours Prior: ­

  • Fit in your manicure and pedicure for flawless nails! ­
  • Get your spray tan about 2­4 days before the wedding ­
  • Pack a wedding day bag with any accessories you may need, emergency beauty tools, etc.

Day before: ­

  • Rehearsal dinner ­
  • Get plenty of rest and drink plenty of water to keep your skin healthy and prevent under eye bags

Day of the Wedding: ­

  • Make sure to wake up bright and early ­
  • Be on time to all your hair and makeup appointments ­
  • Don’t forget to eat and stay hydrated ­
  • Stay relaxed ­
  • Get married and live happily ever after!

Happy Wedding Planning!

By: Sara Ohler Bridal Coordinator; Jennifferandcobridal@gmail.com

Kristine Kerr

How Season Changes Affect Your Skin

As we transition into fall I thought now would be a good time to talk about your skin and how season changes affect it. This is something not really talked about and a lot of people don’t know what a season change can do.
In the warmer seasons you tend to need less moisturizer because it is warm out and this naturally creates more sebum or oil in this skin keeping it well hydrated. As the season changes to fall you may notice redness, dullness, and even breakout. Your skin is very smart and by this point has gotten used to the heat and now has to readjust. With this change you should also change your skin care routine. You should have a summer skincare routine and a winter skin care routine. Summer skincare usually consists of a clear bubbly cleanser according to your skin type and light weight moisturizer that should only be used on areas of the skin that feel dry.
As winter reaches its full potential of cold and wind your skin goes through the worst of all seasons. Going from extreme cold and wind outside into a warm cozy home can cause your skin to form a barrier of extra dead dry skin. This can cause your skin to feel tight, agitated, red, dull, and bumpy. It can also cause more breakouts and this reason is as the dead skin builds on top it forces any breakout underneath to get trapped and spread. A good winter skincare routine should consist of a cleanser, exfoliater, and a heavier moisturizer.
If you are experiencing this during the season changes, are ready to get on the right skincare routine, or you just don’t know which products to use I highly recommend getting a facial. This allows the esthetician to examine what is really going on with your skin and help guide you into the proper products you should be using. Getting facials on a seasonal basis also allows for a deep cleanse, removal of dead skin, and replenishing of proper nutrition and hydration. This in turn will allow your products to work deeper at home. I hope this helped you all and look forward to seeing you in my spa!
Kristine Kerr
Managing Esthetician (https://jenniffer-and-co.com/our-team/our-team/kristine-kerr/)


Some “Do’s” and “Don’ts” for Picking a Wedding Day Salon

Is your wedding day fast approaching or you just said “Yes”? Right now you may be overwhelmed by what you should do when picking a salon for you and your bridal party. Here is a quick list of the “Do’s” and “Don’ts” when picking your wedding day salon.

  1. DO: the Research: Research online and check out the reviews and listen to what others have said about their experiences. Research all the companies that will be assisting you on your wedding day. Obviously people that have gone to a salon know what that salon has to offer, they have experienced the environment of the salon first hand. These people can give you feedback if the salon is professional, clean, efficient, and stylish and if they will be the right fit for your wedding day.
  2. DON’T: have a family or friend do your wedding day hair and makeup for you and your bridal party. It sounds nice to go to somebody you know, but sometimes it’s not that simple. It has been my experience that seven to eight times out of ten, the friend or family member backs out of their commitment. Most of the time it is last minute, leaving the bride hectically trying to find a new salon to take their place. This isn’t too ideal for you or your bridal party, staying away from the family/friend salon can eliminate the stress
  3. DO: Set up a consultation. When it comes to picking the salon in which you are gettingyour wedding day pampering in, set up a consultation with their bridal coordinator. This way you can experience the salon atmosphere and see if they offer what you are looking for. It is so important to feel comfortable in your salon, especially on your wedding day
  4. DON’T: go with the cheaper salon. You usually pay for what you get. Do research oncompetitive hair and makeup pricing that is relative to your area. You might be paying a little more to go to a higher end salon. Higher end salons can have higher rates because they have earned the right to set higher rates by making their client’s wedding day experience go flawlessly. Not only will you and your bridal party look great, but you will also feel relaxed on your perfect day.

written by: Sara Ohler, Jenniffer & Company Bridal Coordinator

Drug Store makeup vs. Department Store

Hey there its Kristine again! So I thought today’s topic would be important to talk about since people are always asking me. I have been in the beauty business for 10 years now. I have work for high end department store makeup lines like Estee Lauder and Clarins. I have also work for Ulta Beauty which offered hundreds of prestige (high end) makeup lines as well as drug store brands.
I have trained, used, and compared ingredients in drug store and department store cosmetics and here is the conclusion I have come to. Department store and prestige makeup lines defiantly blow drug store brands out of the water.
How?

  • Use better quality ingredients.
  • Use less filers like alcohol and silicones.
  • Tend not to clog pores.
  • Use active ingredients that can actually help with skin concerns like wrinkles and acne.
  • You get better service from people who have been thoroughly educated in the line.
  • Better pigment and longer lasting.

Now this does not mean that you need to splurge all your dollar bills on these expensive products. There are some products very similar in ingredients that work just as good as department store makeup. So save your money on nail polish, lip gloss, and mascaras. I don’t care for all drug store brands but my go to’s are:

  • L’Oreal for their: Mascara, eyeliners, and lip products.
  • NYX for their: Eye shadows, eyeliners, and matte lipsticks.
  • Revlon for their: Long stay non sticky lipsticks and nail polish.
  • Neutrogena: Powders and Foundations (Similar to Clinique)
  • Physicians Formula: High pigmented eye shadows and bronzers.

Spend money on good foundations and powders because they will last longer, look better, and not clog your pores. Also spend money on good eyeliners because no one likes the raccoon look at the end of a long day. And lastly spend money on good makeup brushes because they are made of natural fibers that will last a lot longer and help the makeup to go on flawlessly. Now for my Department Store favorites:

  • Estee Lauder: Eyeliners, concealer, and foundations. (The only kind of will wear)
  • IT Cosmetics: CC foundations, brushes, and powders.
  • Dior: Eye shadows
  • Stila- Eye shadow pallets and eyeliners.
  • Laura Geller: Concealers and eye shadows.
  • MAC: Eye shadows, eyeliners, and foundation.
  • Too Face: Bronzers and eye shadow pallets.

So long story short as you can see its kind of a tossup when it comes to department store verses drug store. So my advice is when in doubt look at ingredients or test the products first if you can.
By Kristine Kerr
Master Makeup Artist and Esthetician

Airbrush Makeup

So recently I took a trip to Houston for a Dinair Airbrush Makeup Class.  I have been doing airbrush makeup on my brides for 2 years now and I must say I learned soo much! I got to work one on one with Dina the inventor of airbrush makeup over 25 years ago.  It was such an honor for her to help me perfect my skills.airbrush

For those who don’t know what airbrush makeup is let me tell you! It is a small airbrushing gun that is attached to a small compressor that sprays out makeup like small pixels on the skin.  Foundation goes on 10 times lighter then 1 stroke of liquid foundation.  This makeup can do eye shadows, lipsticks, eyeliners, bronzers, blushes, eyebrows, and even tattoo and varicose vein cover up!  Because this mineral makeup goes on like small pixels it allows your skin to breath so you don’t get any clogged pores or breakouts.  I can’t believe I’m going to say this but you can even sleep in it! It matched beautifully to any skin tone and is very durable.PhotoGrid_1436823372178

If you have not tried this service yet I highly recommend it.  For a special night out or a big event this makeup will leave you looking flawless.  You can get anywhere from a natural look all the way to a full coverage glammed out look.

I am just totally in love with this product and the best part is I am able to do my entire makeup in less than 20 minutes and it looks like I spent hours on it! So the Dinair class was amazing and I couldn’t wait to share this information with you.

By Kristine Kerr: Makeup Artist/Esthetician